Fluffy and tender, these gluten-free pull-apart dinner rolls are the perfect addition to any meal. You’ll need warm water, yeast, sugar, gluten-free flour, salt, melted butter, an egg, xanthan gum (optional), and olive oil. Begin by activating the yeast with warm water and sugar. In another bowl, combine dry ingredients. Mix melted butter, egg, and olive oil into the yeast mixture before gradually adding dry ingredients to form a sticky dough. Knead until smooth and elastic, then let rise for an hour. Punch down, shape into 12 rolls, and let them rise again. Bake at 375°F until golden brown.

Gluten-Free Pull-Apart Dinner Rolls
Gluten-free pull-apart dinner rolls | Myhomemaderecipe.com

When my family and I were first diagnosed with celiac disease, one of the most daunting tasks was finding a recipe for gluten-free dinner rolls that tasted and felt like the traditional homemade rolls we were accustomed to. For years, we struggled with recipes that yielded rolls that were either too dense, too crumbly, or just plain unpalatable. It wasn’t until I attended a baking class with Rachel, the former owner of Gluten Free Mama, that I finally found a solution.

Rachel’s original recipe, which is no longer available online, was a game-changer. With her permission, I have adapted this recipe to share with you, and it has become a staple in our household. These gluten-free dinner rolls are not just a compromise; they are a delight that we enjoy at every holiday meal and at least once a month throughout the year.

Personal Experience and Discovery

Before discovering this recipe, making gluten-free dinner rolls was a frustrating endeavor. Every attempt seemed to end in disappointment, with rolls that were more akin to cardboard than to the soft, fluffy dinner rolls we remembered. But Rachel’s method changed everything. Her approach to using a specific blend of gluten-free flours, along with the right combination of other ingredients, resulted in rolls that were indistinguishable from their gluten-containing counterparts.

Recipe Adaptation and Importance

The recipe I’m sharing today is an adaptation of Rachel’s original, tailored to ensure that it remains accessible and successful for anyone looking to make delicious gluten-free dinner rolls. These rolls are more than just a meal accompaniment; they are a comfort food that brings joy to our table. The texture is pillowy-soft, the taste is rich and buttery, and the overall experience is one of satisfaction and delight.

Recipe Inspiration

The inspiration behind this recipe comes from Rachel’s meticulous approach to gluten-free baking. Her original recipe was designed to mimic the taste and texture of traditional homemade dinner rolls, and it succeeds admirably. The key to this success lies in the careful selection of ingredients and the precise method of preparation.

Ingredients

To make these gluten-free dinner rolls, you will need the following ingredients:

  • Gluten-Free Flour Blend: 2¾ cups (11½ oz.) of a high-quality gluten-free flour blend. I recommend using Gluten-Free Mama’s Almond flour blend, Authentic Foods Multi-Blend Flour, or a similar blend that includes xanthan gum.
  • Xanthan Gum: 1 1/2 tsp. If your flour blend already includes xanthan gum, you can omit this.
  • Yeast: 2 tsp. of SAF instant yeast.
  • Sugar: 1/4 cup.
  • Salt: 1 tsp.
  • Warm Water: 1 cup (105-110°F).
  • Butter or Margarine: 2 Tbsp. of butter, dairy-free margarine, or Spectrum organic shortening.
  • Egg: 1 egg, preferably at room temperature.
  • Cider Vinegar: 1 tsp.

Instructions

Preparing the Dough

To start, combine the dry ingredients in a large mixing bowl. This includes the gluten-free flour blend, xanthan gum, yeast, sugar, and salt. Mix these ingredients together to ensure they are well combined.

Next, with the mixer running on low speed, gradually add the warm water, melted butter or margarine, egg, and cider vinegar. Continue mixing until all the ingredients are fully incorporated. Increase the mixer speed to medium and mix for 3 minutes to ensure the dough is smooth and well combined.

Shaping the Rolls

Spray an 8" or 9" round cake pan or pie plate with cooking spray. 
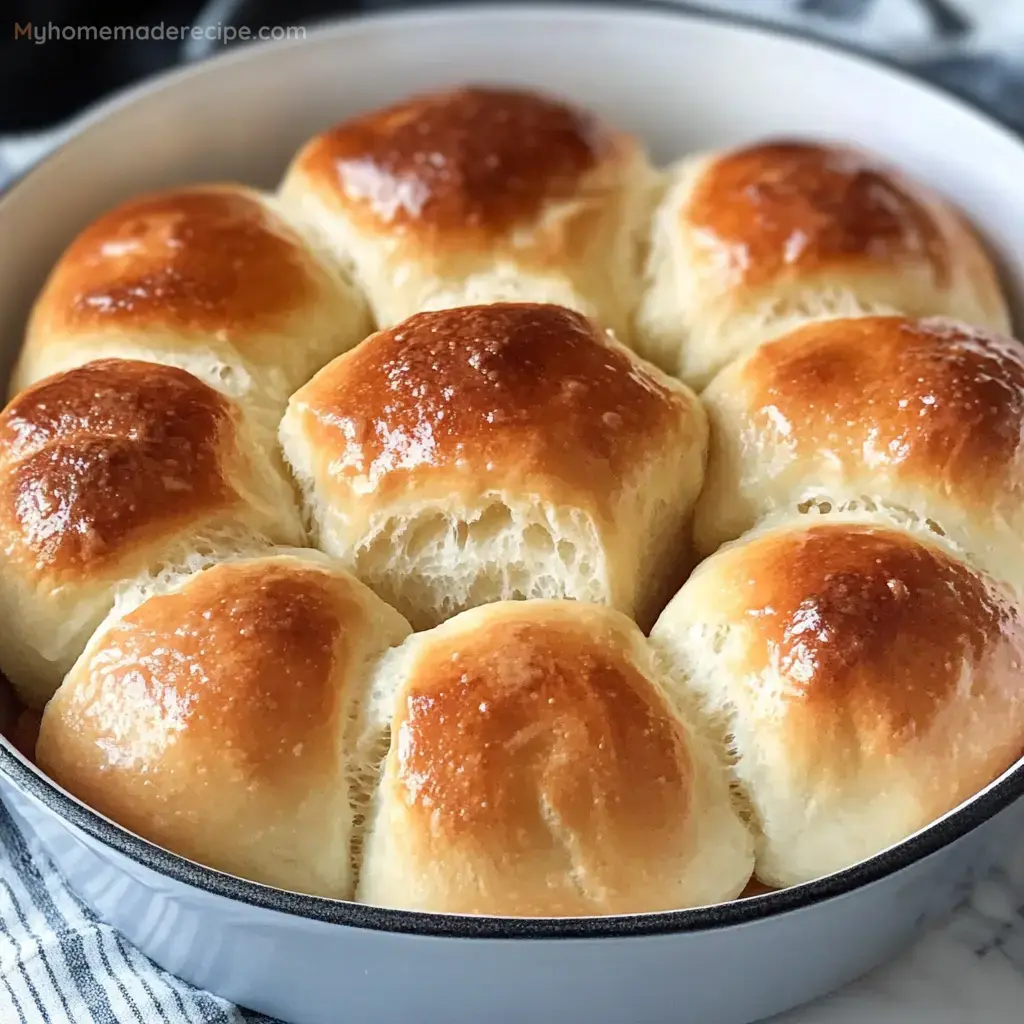
Using a 2" scoop or 1/3 cup measuring cup, scoop the dough into 9 mounds in the pan. Place one mound in the center and the rest around it, forming a circular pattern. Dip your fingertips into warm water and smooth out the tops of the rolls, continuing to wet your fingers as needed to prevent sticking.

Rising the Dough

Cover the pan with a dry towel and let the dough rise in a warm place for 45 minutes to 1 hour. This step is crucial for allowing the yeast to activate and the dough to rise, giving the rolls their characteristic light and airy texture.

Baking the Rolls

Preheat your oven to 400°F during the last few minutes of the rising time. Once the oven is ready, place the pan in the middle rack and bake for 25-28 minutes, or until the tops of the rolls are golden brown and the internal temperature reaches 200°F. Keep an eye on the rolls as oven temperatures can vary.

Finishing the Rolls

After baking, remove the rolls from the oven and brush them with an additional 1/2 to 1 tablespoon of melted butter. This final step adds a rich, buttery flavor and a glossy finish to the rolls.

Tips and Substitutions

Dairy-Free Option

For those who need a dairy-free version, you can substitute the 2 tablespoons of butter with a good dairy-free margarine or Spectrum organic shortening. You can also choose not to brush the finished rolls with butter or use a dairy-free margarine instead.

Egg-Free Option

If you need an egg-free version, you can use ¼ cup of water mixed with 1 tablespoon of ground flaxseed as a substitute for one egg. Simmer the water and flaxseed over medium-low heat for about 5 minutes until thickened, then let it cool before adding it to the recipe.

Gluten-Free Flour Blend

The choice of gluten-free flour blend is critical for the success of this recipe. Look for blends that include xanthan gum, such as Gluten-Free Mama’s Almond flour blend or Authentic Foods Multi-Blend Flour. These blends help provide the necessary structure and texture to the rolls.

Additional Tips

Pans

Using the right pan is important for shaping and baking the rolls. A metal 9" round cake or metal pie pan works best, as it helps the dough maintain its shape and ensures even baking.

Making Ahead

You have the option to make these rolls ahead of time. You can form the dough, refrigerate it overnight, and bake the rolls the next day. Alternatively, you can parbake the rolls, freeze them, and finish baking them later when needed.

Shaping and Baking

Avoid using an egg wash before baking, as it can make the rolls too brown. Instead, brush the rolls with melted butter after baking for a golden, buttery finish. When shaping the rolls, ensure you handle the dough gently to avoid toughening it. Use a measuring cup sprayed with cooking spray to help shape the dough into smooth balls.

The Importance of Quality Ingredients

Gluten-Free Flour Blend

The gluten-free flour blend is the foundation of this recipe. It is essential to use a high-quality blend that includes a mix of different flours and often xanthan gum. This blend helps provide the structure and elasticity that gluten-free doughs often lack. Some recommended blends include Gluten-Free Mama’s Almond flour blend and Authentic Foods Multi-Blend Flour.

Xanthan Gum

Xanthan gum acts as a substitute for gluten, helping to bind the ingredients together and provide the necessary texture. If your flour blend already includes xanthan gum, you can omit the additional amount called for in the recipe.

Yeast

Instant yeast is crucial for making these rolls rise. Ensure you use a high-quality instant yeast, such as SAF instant yeast, and that the water is at the correct temperature (105-110°F) to activate the yeast properly.

Sugar, Salt, and Cider Vinegar

Sugar helps feed the yeast, while salt enhances the flavor. Cider vinegar adds a slight tang and helps balance the flavors in the dough.

Step-by-Step Instructions

Preparing the Dough

  1. Combine Dry Ingredients: In a large mixing bowl, combine the gluten-free flour blend, xanthan gum, yeast, sugar, and salt.
  2. Add Wet Ingredients: With the mixer running on low speed, gradually add the warm water, melted butter or margarine, egg, and cider vinegar.
  3. Mix the Dough: Increase the mixer speed to medium and mix for 3 minutes to ensure the dough is smooth and well combined.

Shaping the Rolls

  1. Prepare the Pan: Spray an 8" or 9" round cake pan or pie plate with cooking spray.
  2. Scoop the Dough: Using a 2" scoop or 1/3 cup measuring cup, scoop the dough into 9 mounds in the pan.
  3. Smooth the Tops: Dip your fingertips into warm water and smooth out the tops of the rolls.

Rising the Dough

  1. Cover the Pan: Cover the pan with a dry towel.
  2. Let it Rise: Let the dough rise in a warm place for 45 minutes to 1 hour.

Baking the Rolls

  1. Preheat the Oven: Preheat the oven to 400°F during the last few minutes of the rising time.
  2. Bake the Rolls: Place the pan in the middle rack and bake for 25-28 minutes, or until the tops are golden brown and the internal temperature reaches 200°F.

Finishing the Rolls

  1. Brush with Butter: After baking, brush the rolls with an additional 1/2 to 1 tablespoon of melted butter.

Soft Gluten-Free Dinner Rolls with Psyllium Husk

While the recipe provided does not include psyllium husk, some gluten-free recipes benefit from its addition. Psyllium husk acts as a gluten substitute, providing elasticity and structure to the dough. If you choose to use psyllium husk, ensure you mix it with water to form a gel before adding it to the dough. This step is crucial for achieving the right texture.

High-Altitude Gluten-Free Dinner Rolls

For those baking at high altitudes, adjustments may be necessary to ensure the rolls rise properly. Generally, you will need to reduce the yeast slightly and increase the liquid content to compensate for the lower air pressure. However, these adjustments can vary, so it’s important to experiment and find what works best for your specific altitude.

Make-Ahead Gluten-Free Dinner Rolls

One of the conveniences of this recipe is the ability to make the rolls ahead of time. You can form the dough, refrigerate it overnight, and bake the rolls the next day. Alternatively, you can parbake the rolls, freeze them, and finish baking them later when needed. This flexibility makes these rolls perfect for busy households or for preparing in advance for special occasions.

Egg-Free Gluten-Free Dinner Rolls

For those who need an egg-free version, using a flaxseed and water mixture as a substitute is a viable option. Mix ¼ cup of water with 1 tablespoon of ground flaxseed and simmer it over medium-low heat until thickened. Let it cool before adding it to the recipe. This substitute works well and maintains the texture and flavor of the rolls.

Gluten-Free Pull-Apart Rolls for Holidays

These gluten-free dinner rolls are perfect for holidays and special occasions. Their pull-apart nature makes them easy to serve and enjoy, and their soft, fluffy texture ensures they are a hit with both gluten-free and non-gluten-free diners. Whether you’re making them for Thanksgiving, Christmas, or any other celebration, these rolls are sure to be a staple on your table.

Simple Gluten-Free Dinner Rolls Recipe

Despite the detailed instructions, this recipe is surprisingly simple and quick to make. The whole process, from mixing the dough to baking the rolls, takes less than two hours. This makes it an ideal recipe for busy weeknights or for those new to gluten-free baking.

Gluten-Free Parker House Rolls

These rolls can be adapted to mimic the famous Parker House rolls. Simply use a combination of melted butter and salt to brush the rolls before and after baking, and ensure you use a high-quality gluten-free flour blend. This will give your rolls a rich, buttery flavor similar to traditional Parker House rolls.

Conclusion: The Joy of Perfect Gluten-Free Dinner Rolls

Making perfect gluten-free dinner rolls is no longer a daunting task with this recipe. By following the detailed instructions and using the right ingredients, you can enjoy soft, fluffy, and deliciously flavorful rolls that are indistinguishable from their traditional counterparts. Whether you’re making them for a special occasion or a simple family dinner, these rolls are sure to bring joy and satisfaction to your table.

Remember, the key to success lies in the careful selection of ingredients and the precise method of preparation. Experiment with different gluten-free flour blends and substitutions to find what works best for you. And don’t hesitate to share your successful tips and substitutions with others, as the gluten-free baking community is always eager to learn and improve.

With this recipe, you’ll never have to settle for less than perfect gluten-free dinner rolls again. So go ahead, take the leap, and enjoy the softest, most delicious gluten-free dinner rolls you’ve ever tasted.

Gluten-free Pull-Apart Dinner Rolls
Gluten-free Pull-Apart Dinner Rolls | MyhomemadeRecipe.com