
 Pin it
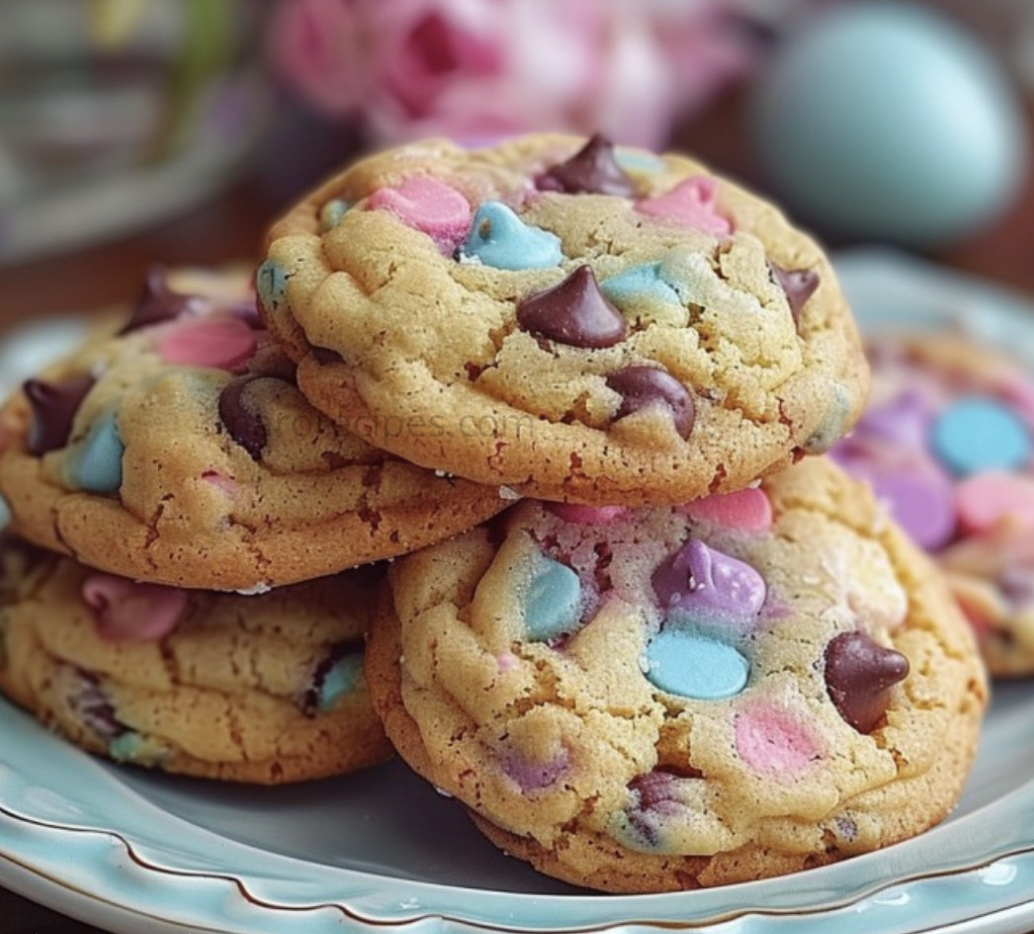
This festive Easter chocolate chip cookie recipe combines classic cookie comfort with playful pastel colors for a spring celebration treat. These marbled cookies are perfect for Easter gatherings and bring a colorful twist to the traditional chocolate chip favorite that both kids and adults will adore.
I first created these cookies for my niece's Easter egg hunt party last year. The children were absolutely mesmerized by the swirling colors and the adults couldn't stop grabbing "just one more." Now they're requested at every spring gathering.
Detailed Ingredients
- All-purpose flour: Provides the perfect structure for these cookies allowing them to spread just enough
- Baking soda: Creates the ideal rise and tender texture
- Salt: Balances the sweetness and enhances all the flavors
- Unsalted butter: Allows you to control the salt content while providing rich flavor. Use room temperature for best results
- Granulated sugar: Creates the crispy edges everyone loves
- Brown sugar: Adds moisture and a deeper caramel flavor
- Large eggs: Bind everything together and provide structure
- Vanilla extract: Adds warmth and depth of flavor. Look for pure extract for best results
- Gel food coloring: Creates vibrant pastel colors without thinning the dough
- Chocolate chips: Provide pockets of melty goodness throughout. Use semisweet for the perfect balance of sweet and slightly bitter
Step-by-Step Instructions
- Prepare Your Space:
- Preheat your oven to 350°F and line baking sheets with parchment paper. Having everything ready before you begin makes the process smooth. Take a moment to ensure your butter has properly softened so it will cream effectively with the sugars.
- Mix The Foundation:
- Whisk together flour, baking soda, and salt in a bowl until well combined. This even distribution of leavening agents ensures your cookies will rise uniformly. Whisking also aerates the flour slightly, giving your cookies a better texture.
- Create The Base:
- Beat the softened butter with both sugars for at least 3 minutes until the mixture becomes notably lighter in color and fluffier in texture. This step incorporates air into the dough for a better rise. Add eggs one at a time, allowing each to fully incorporate before adding the next. Stir in vanilla until the mixture is smooth and fragrant.
- Combine Wet And Dry:
- Add the flour mixture to the butter mixture in three portions, mixing just until no dry streaks remain. Overmixing at this stage can develop too much gluten, resulting in tough cookies so use a gentle hand.
- Add Easter Colors:
- Divide your dough into four equal portions. Work with one portion at a time adding a small amount of gel coloring to each. Fold gently until the color is evenly distributed throughout the dough without overmixing. The colors should be vibrant yet pastel.
- Form Marbled Cookies:
- Take small pieces from each colored dough and gently press them together forming a marbled ball about 1.5 inches in diameter. Place on prepared baking sheet leaving 2 inches between cookies. Press several chocolate chips into the top of each cookie.
- Bake To Perfection:
- Bake for exactly 10 minutes for soft centers or 12 minutes for more structure. The edges should be just turning golden while the centers remain soft. Allow cookies to rest on the hot baking sheet for 5 minutes before transferring to a cooling rack.
My favorite part of making these cookies is watching everyone's face light up when they see the colorful swirls. My grandmother always said we eat with our eyes first and these cookies prove her right every time. The simple joy of creating something both delicious and beautiful makes baking these cookies special.
Make-Ahead Options
These cookies work beautifully as a make-ahead treat. You can prepare the dough up to 3 days in advance and store it covered in the refrigerator. When ready to bake, allow the dough to come to room temperature for about 30 minutes for easier handling. Alternatively, shaped cookie dough balls can be frozen on a baking sheet then transferred to a freezer bag for up to two months. Bake directly from frozen adding 2 minutes to the baking time.
Customizing Your Cookies
While traditional Easter colors work beautifully, this technique adapts to any holiday or occasion. Try red and green for Christmas, orange and black for Halloween, or school colors for graduation parties. The chocolate chips can also be swapped with white chocolate, butterscotch, or peanut butter chips for different flavor profiles. For added texture, consider folding in 1/2 cup of chopped nuts or 1/4 cup of sprinkles to the base dough before dividing and coloring.
Serving Suggestions
These cookies make a stunning addition to any Easter dessert table, especially when arranged on a pastel-colored platter. Pair them with fresh berries and whipped cream for a complete spring dessert. For a special Easter brunch, serve them alongside coffee or tea. They also make perfect additions to Easter baskets or as place settings with each guest's name written on a small tag attached to a cellophane cookie bag.
Frequently Asked Questions
- → How do I make the cookies colorful?
Divide the cookie dough into four portions and mix each with pastel gel food coloring until evenly tinted. Combine portions to create a marbled effect before baking.
- → Can I use natural food coloring?
Yes, natural food coloring can be used, but the colors may be less vibrant than gel food coloring. Adjust the quantity as needed for the desired hues.
- → What type of chocolate chips work best?
Regular semisweet chocolate chips are a great choice, but you can also use white or milk chocolate chips depending on your preference.
- → How do I prevent the dough from spreading too much?
Ensure the butter is just softened, not melted, and chill the dough for 20-30 minutes if it's too soft before baking.
- → Can I freeze the cookie dough?
Yes, you can freeze the marbled dough balls on a baking sheet until firm, then transfer to a freezer-safe bag. Bake directly from frozen, adding an extra 1-2 minutes to the baking time.
- → What’s the best way to store these cookies?
Store the baked cookies in an airtight container at room temperature for up to five days. For longer storage, freeze them in a sealed bag for up to three months.