
 Pin it
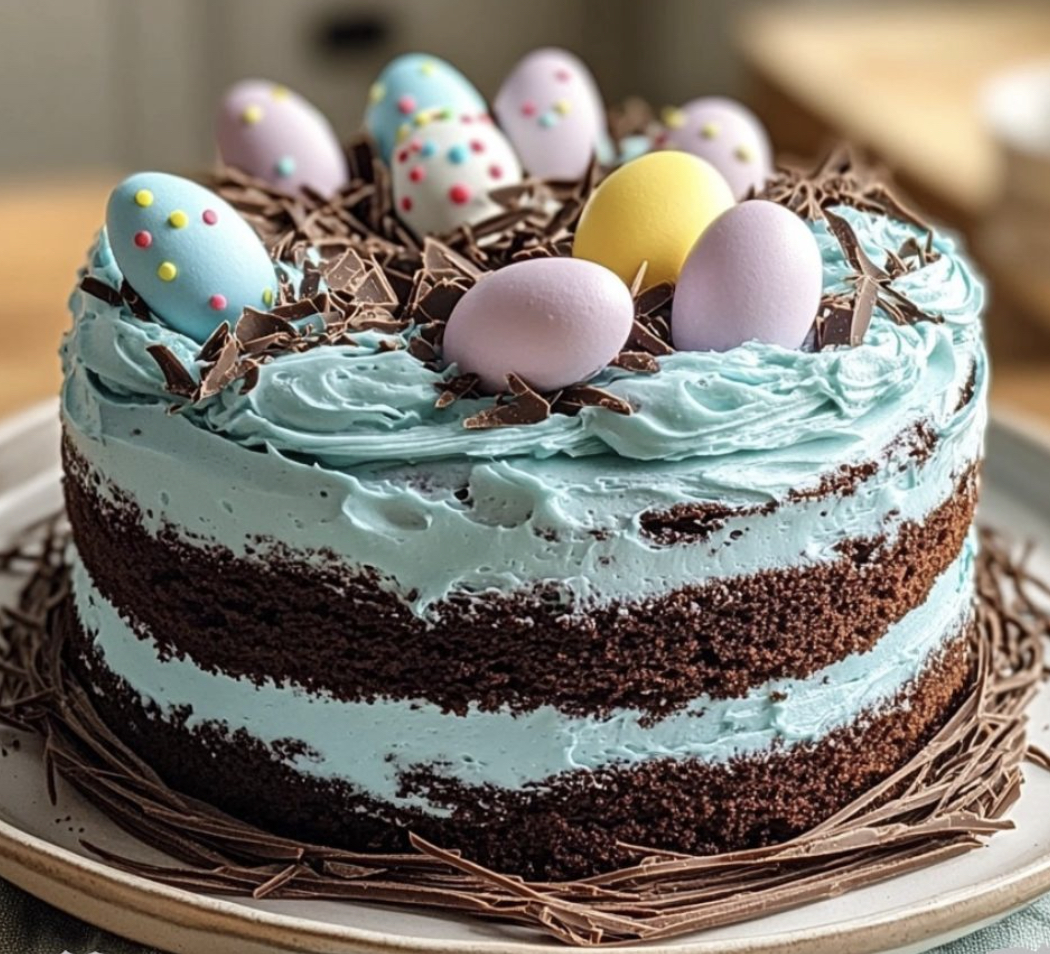
This decadent robin's egg chocolate cake transforms any spring gathering into a special celebration with its moist chocolate layers and vibrant blue frosting that mimics the delicate beauty of robin eggs in a chocolate nest.
I created this cake for my daughter's spring birthday party last year, and the children's faces lit up when they saw the magical blue "eggs" nestled in chocolate. It's now our most requested special occasion dessert from March through May.
Ingredients
- All purpose flour: Creates the perfect structure without being too dense or too light
- Unsweetened cocoa powder: Provides deep chocolate flavor without excessive sweetness
- Buttermilk: Ensures a tender crumb and activates the baking soda for proper rise
- Hot water: Blooms the cocoa powder and creates a uniquely moist texture
- Blue gel food coloring: Works better than liquid food coloring for achieving that perfect robin's egg blue without thinning the frosting
- Candy coated chocolate eggs: Make the perfect finishing touch, look for ones with speckled shells for authenticity
Step-by-Step Instructions
- Prepare Your Workspace:
- Preheat your oven to 350°F and prepare two 8 inch round cake pans by greasing thoroughly and lining with parchment paper circles. I like to spray the parchment too for extra insurance against sticking.
- Mix Dry Ingredients:
- Whisk together the flour, cocoa powder, sugar, baking soda, baking powder, and salt in a large bowl until completely combined and no cocoa lumps remain. Sifting these ingredients gives you extra insurance against lumps.
- Combine Wet Ingredients:
- Add the eggs, buttermilk, vegetable oil, and vanilla extract to your dry mixture. Mix on medium speed for about 2 minutes until the batter is smooth and well combined. The batter will be somewhat thick at this stage.
- Add Hot Water:
- With your mixer on low speed, carefully pour in the hot water gradually. This step is crucial as it develops the chocolate flavor and transforms the batter into a thinner consistency. Mix until fully incorporated, about 1 minute, but do not overmix.
- Bake To Perfection:
- Divide your batter evenly between the prepared pans. Using a kitchen scale ensures equal layers. Bake for 30 to 35 minutes until a toothpick inserted in the center comes out with just a few moist crumbs. The cake layers will spring back slightly when touched.
- Create Robin's Egg Frosting:
- Beat the softened butter for a full 3 minutes until light and fluffy. Gradually add powdered sugar, milk, and vanilla, beating well between additions. Add blue gel coloring a tiny amount at a time until you achieve the perfect robin's egg blue shade.
- Assemble The Masterpiece:
- Place your first cake layer on a serving plate and spread about 1 cup of frosting evenly. Top with the second layer and frost the entire cake with the remaining buttercream, creating smooth sides and top. A bench scraper helps achieve clean edges.
- Create The Nest Effect:
- Gently press chocolate shavings around the top edge of the cake forming a nest shape. Carefully arrange candy eggs in the center of the nest. For authentic robin's egg speckles, mix a small amount of cocoa powder with water and flick it onto the frosting using a clean paintbrush.
Everyone who tries this cake asks about the secret to its intense chocolate flavor. The combination of blooming the cocoa in hot water and using buttermilk instead of regular milk creates a depth of flavor that makes store bought cakes pale in comparison. My grandmother taught me this technique when I was just learning to bake.
Make-Ahead Options
The beauty of this showstopper is how well it works with a busy schedule. Bake the chocolate cake layers up to three days in advance and store them wrapped tightly in plastic wrap at room temperature. You can even freeze the unfrosted layers for up to a month. Just thaw them overnight in the refrigerator before assembling. The frosting can be made a day ahead and stored in the refrigerator. Let it come to room temperature and beat it briefly before using.
Variations To Try
While the robin's egg theme is perfect for spring celebrations, this versatile chocolate cake works year round with different decorative approaches. For birthdays, swap the blue frosting for any favorite color and top with sprinkles instead of the nest. During winter holidays, a mint flavored frosting with chocolate ganache drip creates an elegant dessert. For chocolate purists, skip the blue coloring altogether and create a chocolate nest on chocolate frosting. The moist cake base complements virtually any frosting flavor you can imagine.
Serving Suggestions
Serve this beautiful cake at room temperature for the best flavor and texture. A perfect complement is a scoop of vanilla ice cream or fresh berries on the side. For a special touch, create a raspberry coulis to drizzle on each plate before adding the cake slice. When serving at a spring brunch, add fresh edible flowers around the cake platter for an extra seasonal touch that enhances the garden theme.
Frequently Asked Questions
- → How can I ensure my cake layers are moist?
Use buttermilk in the batter as it adds moisture and a subtle tang, and avoid overbaking by checking for doneness with a toothpick.
- → What’s the best way to achieve the robin’s egg blue frosting?
Use high-quality blue gel food coloring, adding it gradually to the frosting until your desired shade is achieved.
- → How do I speckle the frosting for the robin’s egg effect?
Dip a clean toothbrush into watered-down cocoa powder or black gel coloring and flick it gently onto the frosted cake.
- → Can I make this cake in advance?
Yes, bake the cake layers a day ahead and freeze them. Assemble and frost the cake on the day you plan to serve it.
- → What alternatives can I use for the chocolate egg decorations?
You can substitute candy-coated almonds, small truffles, or colorful sugar-coated candies for the eggs.
- → How do I get smooth frosting on the cake?
Chill the cake layers before frosting, and use an offset spatula or bench scraper for even and smooth application.